Kid's Backseat Organzier-How to
It has been a few weeks since I have taken on a new sewing project. So, over the weekend I decided to tackle a problem that has been bugging me for a while. It never fails that as soon as week get going to town (about 20 min. away) that I hear the following,
"Mom, do you have any paper?" or"Mom, do you have a pencil?"
I do my best to always have a little notoepad in my purse for emergencies, but it's really not safe for me to be digging around in my purse while I'm driving. So, I wanted to make an organizer that would hang on the backseat that would be in easy reach of my oldest. She then, would be in charge of handing out the paper and pencil. So, here is what I came up with.
Remember, I am just learning how to sew. This is a very easy "1st" project if you are learning to sew too. Nothing too complicated.


This is what I came up with. I had 3 criteria for this organizer. 1.) Place for crayons, pencils 2.) place for the paper and 3.) place for the V-Tech Camera (LOVE this thing!)
Have you seen those crayon rolls? Here is a good tutorial from Skip to My Lou if you would like to make one. That was my inspiration for the top pocket.
First thing to do...Get Inspiration. I found some inspiration for design ideas from Amazon and a blog called "The May Fly".
HOW TO MAKE
I. Gathering Materials
1. Measure the back of seat to obtain desired size. I decided mine should be 24"x18".
2. Draw out your plan.
3.Decide how much fabric to cut.
BASE FABRIC: The base is just one piece of fabric that is hemmed all the way around. So, you will actually need to add an extra inch to the length and width. Therefore, my base fabric was 25"x19".
BOTTOM POCKET: Decide how tall you want your pocket to be. We know it is 18" across. I made mine 9" tall. Consider what you want to put in the pocket as you consider your height and how you might like to divide up this bigger pocket into smaller pockets. I wanted mine to have 2 pockets. One to hold a regular notebook or coloring book and the other to hold the V-Tech or some other toys or books. 8" for one and 10" for the other was a good choice.
You are also going to hem the pockets, so you will need to account for that before you cut your fabric. Add
1.5" to the height and 2" to the width.
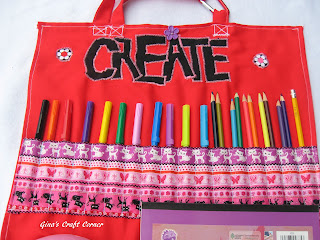
TOP POCKET: I wanted my row to be able to hold crayons or colored pencils, so I had to add a little extra height to the pocket than what you would find on a crayola roll, as I mentioned earlier. I decided I needed my pocket to be at least 4" high.
You will hem this pocket as well. Add 1.5" to the height and 2" to the width.
SPACING: Consider also how much space you want between your top and bottom pockets. I used a 3" space between my 2 pockets.
MY CUT PIECES WERE AS FOLLOW:
BASE: 25" X 19"
BOTTOM POCKET: 10.5" X 20"
TOP POCKET: 5.5" X 20"
(Note: be sure to wash, dry and then iron your fabric before beginning this project)
LET'S SEW!
Once you have all your fabric cut out it is time for the fun to begin!

Step 1) Hem the base fabric all the way around by folding all sides in 1/4" once and then again. Press with iron as you are folding and pin in place. Take it to the machine and sew all the way around. I use 1/8".

Step 2) Take the bottom pocket fabric and hem the "top" of what will be the pocket. hem by folding 1/4" over once, and then again. Press and pin the hem. Take it to the machine and sew just that top edge.

Step 3) Lay the pocket wrong side up in the exact spot you want it on the base fabric and begin folding the other 3 sides over by 1/2" once and then again. I like to have it lying on the base fabric to make sure my edges will match up exactly on the base. Flip over the pocket and begin to pin the sides and bottom edge to the base fabric. The top of the fabric should be left open. Take it to the machine and sew the pocket to the base.

Step 4) Refer back to your plan and measure out how you want this bottom pocket divided up. Use a disappearing marker to draw a line and then sew down that line from the top of your pocket all the way to the bottom. Make sure you backstitch at the beginning and end. I actually go over the ends about 3-4 times to make sure they are really strong. (May be overkill :) )
Step 5) You will treat the top pocket the same way. Hem the top section of the pocket first, folding 1/4" twice. Press, pin and sew. Lay out on your base and fold over the other 3 sides, folding 1/2" twice. Press, pin to base and then sew along sides and bottom only, leaving open the top.


Step 6) In order to hold a crayon or pencil, the larger pocket needs to be divided up into 1" sections. Measure with a ruler and mark with your disappearing marker again at every 1" mark. I like to draw the entire line b/c I like a road to sew on. Remember to backstitch a couple of times at the beginning and end.
(Just a side note. I decided to go with washable markers and colored pencils b/c I began to think about all the crayons that have melted in my car in the heat of the summer. NOT so nice. Just something to consider.)
Step 7) Create a heading:
As you can see, there is this big blank space above the pencils. Well, I had to do something about that! I checked out a book recently called Sew Wild by Alisa Burke. I LOVE her creations and she inspired me to try this next technique.

I first marked a line to know how far up the colored pencils would go, so my words would not be covered up. I then found some scrap fabric and wrote out the word create in block letters, cut them out and pinned them to my base fabric.

Now sew each letter in place with a contrasting thread and a closely spaced zigzag stitch, starting with the last letter. (The settings on my machinge were: Length @ 4 and Width @ .5). After I started sewing, I realized that it was easier to remove all the letters and just sew one letter at a time. The 2nd will lay over the previous letter just a little bit. Continue until they are all sewn on.
 I also decided to cut out some flowers from another fabric and sew them on.
Step 8) Make and attach the handles.
ALMOST THERE! Take a break and grab another can of soda (Well, that's what I did.). We need to attach handles to the top and elastic to the bottom and then we will be finished.
I was not for sure how long my handles needed to be or even how I was going to attach this thing. I decided to make a long handle, attach one end and then go from there. Use my numbers as an approximation, but before sewing anything down, take it out to your car and make any necessary adjustments.

To make a handle, cut a strip that is 24" long and 2" wide. Fold the sides over to meet in the middle and press into place with an iron. (Note: 4" of this handle will be cut off to make a tab for the opposite side.)
 Fold the ends over a little, press and then fold the entire strip over on itself lengthwise.
 Take the strip to the machine and sew along the edge and ends.
Cut off 4" off the end now and zigzag the ends so they do not fray.
 Position the handle where you want it. (I took mine back out to my car to check the placement.)

Attach one end of the the handle to the wrong side of the base by sewing a square and an X. Go over a LOT to secure. Slide on some type of hooking device and then sew down the other end right next to the first. (I know, my square IS pretty sloppy. I just need to sloooooow doooooown.)
 Sew down your tab on the opposite side. I think I did much better on this X.
 This is what it will look like when hooked together on the back of the seat. An adjustable strap would have been nice, but I just wanted to do this cheaply. I found this clamp in the junk drawer, and it worked.
Ugh, that left square is SO ugly, but I'm learning...I'm learning.
Step 9) Adding elastic to bottom. You will need about 15" of elastic at least.


You need to add elastic to the bottom so that it fits snug against the seat. I did not want it hanging down on my daughter's feet. To solve this problem, just grab any elastic you can find and while the organizer is hanging on the back of the seat, pin one side of the elastic to one corner. Then, wrap the elastic around the front of the seat and let it slip into the crack between the back and bottom of seat. Grab the elastic and make a mark as to where the elastic will reach the other corner and be able to wrap around a button. Place a pin to mark the spot where you will sew on your button.

 Sew a little loop on one end of the elastic in a couple of places to secure.
 Now go try it out!

This is a good beginner sewing project. Be creative and put your own spin on it!
Have you ever made one of these? Do you have any advice for people making one?
Next on my agenda????? I want to play more with the idea of letters on fabric and free-motion stitching. Maybe on a notebook cover????
Blessings to you and thanks for visiting my site!
If you like what you see please follow me on Facebook (top right tab), G+1 me, or click on the 'Follow Me' link to see whenever I post something new. :)
~Gina~
This project was featured here:

This post is linked up at:
Hope Studios- Tutorial Tuesday
Homework - Tuesday Link Party
Ladybug Blessings- Tuesday Link Party
BeBetsy- Tuesday Link Party
Crafty Confessions -Tuesday Link Party
Adventures of a DIY Mom- Tuesday Link Party
Naptime Creations-Tuesday Link Party
Wednesday Whatsits party
Learn as We Go Wednesday Link Party
The Thriftiness Miss Friday Party
Happy Hour Friday
Craftionary Friday
My Turn-Freedom Friday
Redfly Creations Friday Party
Happy and Blessed-Family Fun Friday
Chic on a Shoestring- Friday Party
Blissful and Domestic - Friday Party
504 Main- Tickled Pink Friday Party
Liz Marie- Inspire Me Friday Party
Homecoming - DIY's Party
All Our Days - Finished Friday Party
"Mom, do you have any paper?" or"Mom, do you have a pencil?"
I do my best to always have a little notoepad in my purse for emergencies, but it's really not safe for me to be digging around in my purse while I'm driving. So, I wanted to make an organizer that would hang on the backseat that would be in easy reach of my oldest. She then, would be in charge of handing out the paper and pencil. So, here is what I came up with.
Remember, I am just learning how to sew. This is a very easy "1st" project if you are learning to sew too. Nothing too complicated.


This is what I came up with. I had 3 criteria for this organizer. 1.) Place for crayons, pencils 2.) place for the paper and 3.) place for the V-Tech Camera (LOVE this thing!)
Have you seen those crayon rolls? Here is a good tutorial from Skip to My Lou if you would like to make one. That was my inspiration for the top pocket.
First thing to do...Get Inspiration. I found some inspiration for design ideas from Amazon and a blog called "The May Fly".
HOW TO MAKE
I. Gathering Materials
1. Measure the back of seat to obtain desired size. I decided mine should be 24"x18".
2. Draw out your plan.
3.Decide how much fabric to cut.
BASE FABRIC: The base is just one piece of fabric that is hemmed all the way around. So, you will actually need to add an extra inch to the length and width. Therefore, my base fabric was 25"x19".
BOTTOM POCKET: Decide how tall you want your pocket to be. We know it is 18" across. I made mine 9" tall. Consider what you want to put in the pocket as you consider your height and how you might like to divide up this bigger pocket into smaller pockets. I wanted mine to have 2 pockets. One to hold a regular notebook or coloring book and the other to hold the V-Tech or some other toys or books. 8" for one and 10" for the other was a good choice.
You are also going to hem the pockets, so you will need to account for that before you cut your fabric. Add
1.5" to the height and 2" to the width.
TOP POCKET: I wanted my row to be able to hold crayons or colored pencils, so I had to add a little extra height to the pocket than what you would find on a crayola roll, as I mentioned earlier. I decided I needed my pocket to be at least 4" high.
You will hem this pocket as well. Add 1.5" to the height and 2" to the width.
SPACING: Consider also how much space you want between your top and bottom pockets. I used a 3" space between my 2 pockets.
MY CUT PIECES WERE AS FOLLOW:
BASE: 25" X 19"
BOTTOM POCKET: 10.5" X 20"
TOP POCKET: 5.5" X 20"
(Note: be sure to wash, dry and then iron your fabric before beginning this project)
LET'S SEW!
Once you have all your fabric cut out it is time for the fun to begin!

Step 1) Hem the base fabric all the way around by folding all sides in 1/4" once and then again. Press with iron as you are folding and pin in place. Take it to the machine and sew all the way around. I use 1/8".

Step 2) Take the bottom pocket fabric and hem the "top" of what will be the pocket. hem by folding 1/4" over once, and then again. Press and pin the hem. Take it to the machine and sew just that top edge.

Step 3) Lay the pocket wrong side up in the exact spot you want it on the base fabric and begin folding the other 3 sides over by 1/2" once and then again. I like to have it lying on the base fabric to make sure my edges will match up exactly on the base. Flip over the pocket and begin to pin the sides and bottom edge to the base fabric. The top of the fabric should be left open. Take it to the machine and sew the pocket to the base.

Step 4) Refer back to your plan and measure out how you want this bottom pocket divided up. Use a disappearing marker to draw a line and then sew down that line from the top of your pocket all the way to the bottom. Make sure you backstitch at the beginning and end. I actually go over the ends about 3-4 times to make sure they are really strong. (May be overkill :) )
Step 5) You will treat the top pocket the same way. Hem the top section of the pocket first, folding 1/4" twice. Press, pin and sew. Lay out on your base and fold over the other 3 sides, folding 1/2" twice. Press, pin to base and then sew along sides and bottom only, leaving open the top.


Step 6) In order to hold a crayon or pencil, the larger pocket needs to be divided up into 1" sections. Measure with a ruler and mark with your disappearing marker again at every 1" mark. I like to draw the entire line b/c I like a road to sew on. Remember to backstitch a couple of times at the beginning and end.
(Just a side note. I decided to go with washable markers and colored pencils b/c I began to think about all the crayons that have melted in my car in the heat of the summer. NOT so nice. Just something to consider.)
Step 7) Create a heading:
As you can see, there is this big blank space above the pencils. Well, I had to do something about that! I checked out a book recently called Sew Wild by Alisa Burke. I LOVE her creations and she inspired me to try this next technique.

I first marked a line to know how far up the colored pencils would go, so my words would not be covered up. I then found some scrap fabric and wrote out the word create in block letters, cut them out and pinned them to my base fabric.

Now sew each letter in place with a contrasting thread and a closely spaced zigzag stitch, starting with the last letter. (The settings on my machinge were: Length @ 4 and Width @ .5). After I started sewing, I realized that it was easier to remove all the letters and just sew one letter at a time. The 2nd will lay over the previous letter just a little bit. Continue until they are all sewn on.


Step 8) Make and attach the handles.
ALMOST THERE! Take a break and grab another can of soda (Well, that's what I did.). We need to attach handles to the top and elastic to the bottom and then we will be finished.
I was not for sure how long my handles needed to be or even how I was going to attach this thing. I decided to make a long handle, attach one end and then go from there. Use my numbers as an approximation, but before sewing anything down, take it out to your car and make any necessary adjustments.

To make a handle, cut a strip that is 24" long and 2" wide. Fold the sides over to meet in the middle and press into place with an iron. (Note: 4" of this handle will be cut off to make a tab for the opposite side.)


Cut off 4" off the end now and zigzag the ends so they do not fray.


Attach one end of the the handle to the wrong side of the base by sewing a square and an X. Go over a LOT to secure. Slide on some type of hooking device and then sew down the other end right next to the first. (I know, my square IS pretty sloppy. I just need to sloooooow doooooown.)


Ugh, that left square is SO ugly, but I'm learning...I'm learning.
Step 9) Adding elastic to bottom. You will need about 15" of elastic at least.


You need to add elastic to the bottom so that it fits snug against the seat. I did not want it hanging down on my daughter's feet. To solve this problem, just grab any elastic you can find and while the organizer is hanging on the back of the seat, pin one side of the elastic to one corner. Then, wrap the elastic around the front of the seat and let it slip into the crack between the back and bottom of seat. Grab the elastic and make a mark as to where the elastic will reach the other corner and be able to wrap around a button. Place a pin to mark the spot where you will sew on your button.


This is a good beginner sewing project. Be creative and put your own spin on it!
Have you ever made one of these? Do you have any advice for people making one?
Next on my agenda????? I want to play more with the idea of letters on fabric and free-motion stitching. Maybe on a notebook cover????
Blessings to you and thanks for visiting my site!
If you like what you see please follow me on Facebook (top right tab), G+1 me, or click on the 'Follow Me' link to see whenever I post something new. :)
~Gina~
This project was featured here:
This post is linked up at:
Hope Studios- Tutorial Tuesday
Homework - Tuesday Link Party
Ladybug Blessings- Tuesday Link Party
BeBetsy- Tuesday Link Party
Crafty Confessions -Tuesday Link Party
Adventures of a DIY Mom- Tuesday Link Party
Naptime Creations-Tuesday Link Party
Wednesday Whatsits party
Learn as We Go Wednesday Link Party
The Thriftiness Miss Friday Party
Happy Hour Friday
Craftionary Friday
My Turn-Freedom Friday
Redfly Creations Friday Party
Happy and Blessed-Family Fun Friday
Chic on a Shoestring- Friday Party
Blissful and Domestic - Friday Party
504 Main- Tickled Pink Friday Party
Liz Marie- Inspire Me Friday Party
Homecoming - DIY's Party
All Our Days - Finished Friday Party


This is lovely will have to make one for my grandsons
ReplyDeleteThanks, Tracy! I'd love to see it when you do! :)
DeleteGood morning, Gina! LOVE this!! You did a fantastic job on it ;) So fun and handy, any kid would love to have this in the car! :) Thanks for visiting me today!! Hope your day is off to a lovely start!
ReplyDeleteThanks, Brenda! And thanks for stopping by. :)
DeleteThanks, Tracy. We gave it a test run yesterday, and it went over well. :)
ReplyDeleteI want one! Actually, I'll have to make at least three! If I make it for one of the littles I have to make at least two more, I'm pretty sure my 13 and 16 year old will pass though! Thanks for the tute! It's awesome! Kim :)
ReplyDeleteThanks, Kim! We've been using it for a week now, and I like everything about it. I do need to cinch up the top a little. If you are able to make one you should probably make it so it has an adjustable strap. Thanks so much for dropping me a line!
DeleteWow! What a beautiful organizer. Pinned this. I think my MOPS friends would love this! Join us for Family Fun Friday. Share your posts with 100+ bloggers and 400+ readers.
ReplyDeletehttp://happyandblessedhome.com/category/family-fun/
Thanks!
Monica
Thank you, Monica! Thanks for pinning, and for sure will stop by your Family Fun Friday! :) Have a great weekend!
DeleteGina
I am so happy you stopped by and commented on the wood letters! Your blog is designed so cute, love it! I look forward to checking out more of your posts soon as I like simple sewing projects, I am not the best sewer but I enjoy to sew!
ReplyDeleteThanks for visiting!
Deleteoops, forgot to say - I became a new follower on Google circles and friend connect
ReplyDeletePinned again - its just so cute! Thanks for linking up at Family Fun Friday. Sincerely,
ReplyDeleteMonica
http://happyandblessedhome.com
Thank you! Thank you!!
Deleteperfect!! I need to make a couple of these. We live in Hong Kong so use public transport most of the time, but we are headed to the US this summer with a 2 and 4 year old and will be doing lots of driving! Thanks for linking up to Tasteful Tuesdays and for the link back :o) Can't wait to see what you bring next week. Emily @ Nap-Time Creations
ReplyDeleteoh, and I just posted an amazing round-up from last weeks party… stop on over and check it out!
Thanks for stopping by Emily! I'm glad you liked it!
ReplyDeleteAmazing. I love this idea. I have been wanting to keep my little one busy on long road trips. And this is awesome! :)
ReplyDeleteThank you, Hani! It is working out nicely for us. ;)
DeleteOh my goodness.. My little guy seriously needs one of these :) There are crayons all over my van lol.. Thanks for sharing this with us at the Weekend Wonders party! Hope you have a great day!
ReplyDeleteThanks for the comment! Yes, crayons can be an issue. I banned crayons during the summer months b/c of the melting issue! :) Thanks for stopping by!
DeleteGreat idea for road trips. Thanks for stopping by my blog and leaving a sweet comment. Can't wait to see the T Shirt Tote bag your daughter makes. Following you via Facebook.
ReplyDeleteThanks for stopping by, Christa! And, thanks for the like on facebook!
DeleteThis is such a great idea! We're featuring you this week at Finished Friday.
ReplyDeleteThank you! You just made my day! It's my first feature. :)
DeleteThanks, Leslie! I would love to link up. :)
ReplyDeleteLove this, Gina! Just saw you featured at Love and Laundry. Now it's your second feature, too!
ReplyDeleteWhat!? I did not know that! Thanks for telling me and for stopping by, Heidi. :)
DeleteI would love for you to share and link up at my weekly TGIF Link Party if you haven't already this week. The party is open every Thursday night and closes Wednesday's at midnight. http://apeekintomyparadise.blogspot.com/. AND starting Wednesday June 4th I will be hosting a Wordless Wednesday link party. Hope you will join us!
ReplyDeleteHave a wonderful week!
Hugs, Cathy
Thanks, Cathy! I will be there!
Delete