DIY Pinecone Wreath
I know Thanksgiving is not even here yet, but I am so ready to decorate for Christmas!! Don't worry, I did not drag out the tree YET. (We'll be doing that this weekend! (giggle) I compromised and only decorated my kitchen for now! I put some garland and lights over my cabinets and I made an easy pinecone wreath that you can make too!
To make a pinecone wreath like the one pictured above, you first need to find some pincones.
On a visit to the in-laws my girls and I collected about 3 piles just like this one! I collected some little ones like these and I also collected some bigger pinecones for a separate wreath.
You will also need some type of wreath form. I decided to go with a foam form for this wreath.
Here are the other materials you will need to complete this project:
*hot glue gun and lots of glue sticks
*brown spray paint
*burlap ribbon
*red ribbon
*fake berries
*scissors
Begin by hot gluing the pine cones around the inside of the circle first.
Once you have finished the inner circle move to the next row until the entire surface is covered. Try to keep the pinecones as close together as possible. I was amazed at how good these cones stuck to this foam.
Note: For this wreath I used pinecones that were all about the same size.
When your wreath is completely covered with pincones it should look something like this...
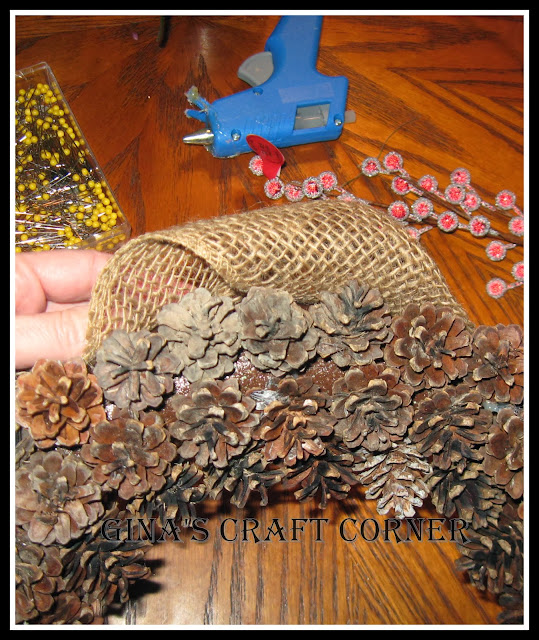
The next step is to add the burlap ribbon to the outside of the wreath.
The only pins that would work well to attach this ribbon were my sewing pins. I hated to use them, but it did not take too many. I was worried you'd be able to see the big yellow balls on the head of my pin, but you can't unless you are really looking up close. And you cannot see them when the wreath is hanging on my wall. I would suggest trying to find something not so obvious if you will be selling these.
I wanted my ribbon to look wavy around the edges, so I did mine like this. Make a little wave and then pin. Decorate your wreath however you want! You can just leave it as is and it will still be lovely!
Continue wrapping until you have gone all the way around. Wave...pin...wave..pin... There are so many wide holes in this ribbon that you really do have to have a pin with a large head to get it to stay in place.
Tip: I did try to hot glue this ribbon to the foam. As the ribbon was being pulled it just ripped right off the foam and I was left with a big green gap. So, I recommend pinning.
When you are finished wrapping your wreath in burlap it should look something like this. Cut the end off your ribbon, tuck under and then secure with a pin.
I wanted to add some color to my wreath. I thought it looked a little drab for Christmas, so I decided to clip off some of these little berries and stick them into the foam wreath. It's also a good way to fill in any gaps in your wreath where you could not get the pinecones close enough together.
Once the berries are in place it still needed a big splash of color so I added some ribbon to hang it with and it finally looked perfect! What do you think?
To get my bow to look like this... (I'm going to tell you this b/c I had a hard time figuring out how to get it to look just like I wanted!)...you have to wrap your ribbon around the wreath and then tie a simple bow. That was the easy part. The hard part was getting it to hang on my little nail! I finally decided to snip a little hole in the ribbon at the back, right under the bow. I used that hole to hang it with and it worked! My bow is above the nail. It has not moved for 3 days and the ribbon has not ripped, so I think this solution works. :)
You can see my kitchen lights that are over my cabinets in the reflection of the glass! :)
I am just so proud of my first pinecone wreath! I'm going to show it off now with lots of pictures at different angles. (trying to find a professional pose!) :)
I hope you enjoyed this post! If you try this wreath please let me know so I can hop on over and look at it!
I have a few more pinecone post to come! If you don't want to miss them I encourage you to follow my blog with any of the purple links on my sidebar. Better yet, why not follow by e-mail!
Blessings,
~Gina
THIS POST HAS BEEN FEATURED AT...
I WILL BE LINKING UP TO THESE GREAT PARTIES!


Comments
Post a Comment
I LOVE..LOVE...LOVE...comments from you! It truly makes my day! So, leave a comment AND your webpage or social media link and I will get back with you. Thanks in advance!!
~Gina